Android Client Integration
Use the Android SDK to collect mobile application events, persist queued data, support deep links, send device tokens, and optionally capture mobile ad metadata.
This guide rewrites the client setup as a production integration path. Replace every placeholder with values provisioned for your DriveMetaData Android source.
Capabilities
| Capability | Use for |
|---|---|
| Event collection | Custom app events after SDK initialization |
| Batched delivery | Fewer network calls and lower battery impact |
| Local persistence | Reduces data loss during app or OS interruptions |
| Deep links | Parse foreground and background deep-link payloads |
| Mobile ads metadata | Banner, interstitial, and rewarded ad tracking |
| Device token updates | Send push notification tokens with stable user identifiers |
| Uninstall tracking support | Provide Firebase token and service account inputs for uninstall workflows |
| Debug logging | Enable SDK logs during integration testing |
Requirements
- Android application project with Gradle.
- DriveMetaData
clientId, AndroidclientToken,appId, and optionalmetaAppId. - Network access from the app.
- Google Mobile Ads dependency only if ad tracking is enabled.
Do not place a backend/server token in an Android application. Mobile credentials should be provisioned for the Android source and scoped separately from server credentials.
1. Add Network Permission
Add internet access to AndroidManifest.xml:
<uses-permission android:name="android.permission.INTERNET" />
2. Install the SDK
Add the DriveMetaData Android SDK dependency to the app module Gradle file:
dependencies {
    implementation 'com.drivemetadata:dmd-android-sdk:1.3.7'
}
Sync the project after changing Gradle dependencies.
3. Initialize in the Application Class
Initialize the SDK once from your Application subclass. This keeps the SDK available before activities start sending events.
import android.app.Application;
import com.drivemetadata.DriveMetaData;

public class App extends Application {
    @Override
    public void onCreate() {
        super.onCreate();

        DriveMetaData driveMetaData = new DriveMetaData.Builder(
            this,
            1234,                 // clientId
            "android_client_token",
            5678,                 // appId
            "meta_app_id"         // optional Meta app ID
        ).build();

        DriveMetaData.setSingletonInstance(driveMetaData);
    }
}
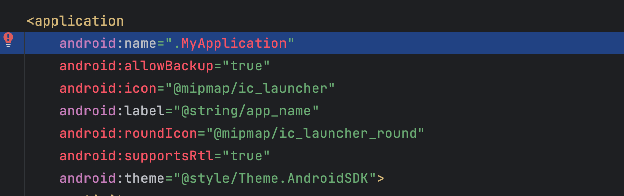
Register the application class in AndroidManifest.xml:
<application
    android:name=".App"
    ...>
    ...
</application>
Initialization Parameters
| Parameter | Description |
|---|---|
Context | Application context. Prefer the Application instance for initialization. |
clientId | DriveMetaData client ID for the Android source. |
clientToken | DriveMetaData Android client token. |
appId | DriveMetaData application ID. |
metaAppId | Meta App ID when Meta-related integration is required. |
The SDK instance is intended to be a singleton. After initialization, event methods can be called from app screens and services as needed.
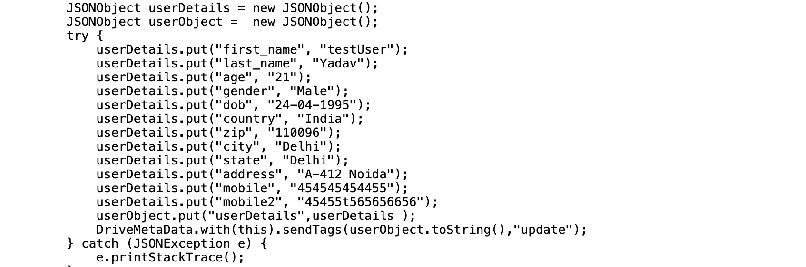
4. Send Custom Events
Send structured JSON data with an event name:
import org.json.JSONException;
import org.json.JSONObject;

JSONObject properties = new JSONObject();

try {
    properties.put("screen", "Checkout");
    properties.put("source", "cart");

    DriveMetaData.with(this).sendTags(
        properties.toString(),
        "Checkout Started"
    );
} catch (JSONException exception) {
    exception.printStackTrace();
}
Use stable event names and JSON keys. Avoid sending passwords, payment card data, access tokens, or other sensitive secrets.
5. Register Callbacks
Register callbacks when you need delivery or SDK response visibility during integration testing:
DriveMetaData.with(this).setDriveMetaDataCallbacks(this::onResponse);
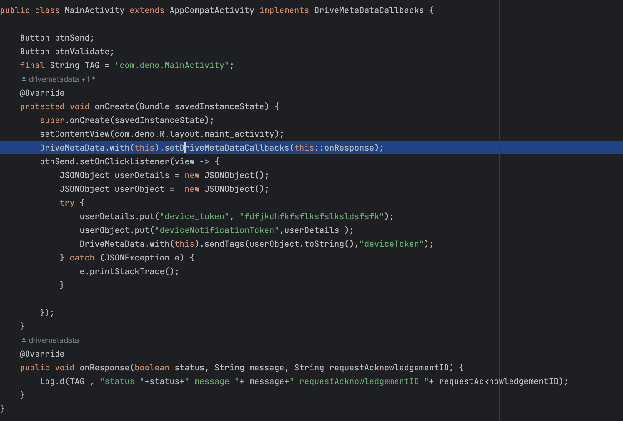
Keep callback logic lightweight. Do not block the UI thread while handling SDK responses.
6. Enable Debug Logs
Enable debug logs in non-production builds while validating setup:
DriveMetaData.enableDebugLog(this, true);
Disable verbose SDK logging for production releases:
DriveMetaData.enableDebugLog(this, false);
7. Configure Deep Links
Add a verified app link intent filter to the launcher or target activity:
<activity
    android:name=".MainActivity"
    android:exported="true">
    <intent-filter>
        <action android:name="android.intent.action.MAIN" />
        <category android:name="android.intent.category.LAUNCHER" />
    </intent-filter>

    <intent-filter android:autoVerify="true">
        <action android:name="android.intent.action.VIEW" />
        <category android:name="android.intent.category.DEFAULT" />
        <category android:name="android.intent.category.BROWSABLE" />
        <data android:scheme="https" />
        <data android:scheme="http" />
        <data android:host="deep.drivemetadata.com" />
    </intent-filter>
</activity>
Replace deep.drivemetadata.com with the domain assigned to your integration.
For verified Android App Links, assetlinks.json, deferred deep-link setup, and dynamic deep-link API creation, see Android App Links and Dynamic Deep Links.
Handle foreground deep-link data:
import android.net.Uri;

Uri uri = getIntent().getData();

if (uri != null) {
    String deepLinkData = DriveMetaData.handleDeepLink(this, uri);
    // deepLinkData is a JSON string. Parse and validate before use.
}
Fetch background deep-link data:
Uri uri = getIntent().getData();

if (uri != null) {
    DriveMetaData.getBackgroundData(this, uri, new DeepLinkCallBack() {
        @Override
        public void onResponse(String response) {
            Log.d("DMD DeepLink", response);
        }

        @Override
        public void onError(Exception exception) {
            Log.d("DMD DeepLink", exception.toString());
        }
    });
}
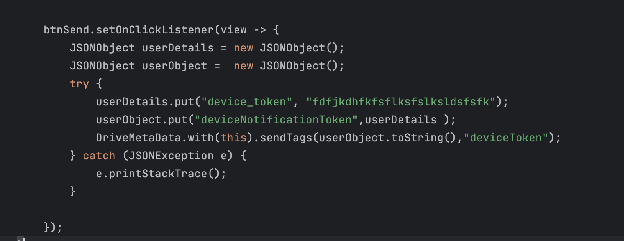
8. Send Device Tokens
Send push notification tokens with stable user identifiers when the token is created or refreshed:
JSONObject deviceNotificationToken = new JSONObject();
JSONObject userIdentifier = new JSONObject();
JSONObject payload = new JSONObject();

try {
    deviceNotificationToken.put("device_token", token);
    userIdentifier.put("customer_id", "customer_123");
    userIdentifier.put("mobile", "+15555550123");

    payload.put("deviceNotificationToken", deviceNotificationToken);
    payload.put("userIdentifier", userIdentifier);

    DriveMetaData.with(this).sendTags(payload.toString(), "deviceToken");
} catch (JSONException exception) {
    exception.printStackTrace();
}
Use your own stable customer identifier values. Do not hard-code real phone numbers or customer IDs in source code.
For Firebase token retrieval and uninstall tracking setup, see Mobile Uninstall Tracking.
9. Track Mobile Ads
Add the Google Mobile Ads dependency only when ad tracking is required:
dependencies {
    implementation 'com.google.android.gms:play-services-ads:22.0.0'
}
Send ad metadata using the SDK method that matches the ad format:
DriveMetaData.sendBannerDetails(context, adView, adRequest);
DriveMetaData.sendInterstitialAdsDetails(context, interstitialAd);
DriveMetaData.sendRewardedAdAdsDetails(context, rewardedAd);
10. Configure Facebook Install Referrer Access
If the integration needs Facebook or Instagram install referrer visibility, add package visibility queries to AndroidManifest.xml:
<queries>
    <package android:name="com.facebook.katana" />
    <package android:name="com.instagram.android" />
    <package android:name="com.facebook.lite" />
</queries>
11. Clean Up the SDK Instance
Call clean() only when you intentionally need to clear the SDK reference and related in-memory state:
driveMetaData.clean();
Do not call cleanup during normal screen transitions.
Meta App ID Setup
Create and copy the Meta App ID from Meta for Developers when Meta integration is required:
- Open Meta for Developers and sign in.
- Create or select a developer account.
- Choose My Apps and create a new app.
- Select the app type that matches your business use case.
- Enter the app name, contact email, and business account details when required.
- Complete account or business verification if prompted.
- Copy the App ID from the app dashboard.
- Add the required Android platform settings, including package name and key hashes.
- Request any required permissions through App Review before production use.
Related Guides
Production Checklist
- Initialize the SDK once in the
Applicationclass. - Register the
Applicationclass inAndroidManifest.xml. - Use Android client credentials only; never ship server credentials in the app.
- Validate event names and JSON payload schemas before release.
- Confirm app link domain ownership and
android:autoVerifybehavior. - Send device token updates when tokens rotate.
- Keep debug logs disabled in production builds.
- Add Google Mobile Ads and package visibility dependencies only when those features are required.
- Test event delivery on fresh install, upgrade, offline, background, and process-restart scenarios.
Troubleshooting
| Symptom | Check |
|---|---|
| Events do not appear | Confirm SDK initialization, credentials, network access, and event method calls. |
| Deep links return empty data | Confirm the intent filter host, scheme, app link verification, and incoming Uri. |
| Device token is missing | Confirm token refresh handling and JSON payload shape. |
| Ads methods fail to compile | Confirm Google Mobile Ads dependency and imports are present. |
| Integration is hard to inspect | Enable debug logs in a non-production build and register callbacks. |